My journey on the road to Emmaus: reconstructing Caravaggio’s 1601 masterpiece

Michelangelo Merisi da Caravaggio’s Supper of Emmaus 1601, National Gallery of Art London.

My completed reconstruction! 2024-2025. Private collection.
Part I: Personal Journey
Every sacred art commission is an opportunity for me to both pray for the client’s intentions and to allow myself to be formed, just like the work of art that I am making, by God the supreme artist. The Supper at Emmaus tells the story of the two disciples who were leaving Jerusalem after the terror of the Crucifixion. In Luke 24:13-35 (ESV) we read:
13 That very day two of them were going to a village named Emmaus, about seven miles from Jerusalem, 14 and they were talking with each other about all these things that had happened. 15 While they were talking and discussing together, Jesus himself drew near and went with them. 16 But their eyes were kept from recognizing him. 17 And he said to them, “What is this conversation that you are holding with each other as you walk?” And they stood still, looking sad. 18 Then one of them, named Cleopas, answered him, “Are you the only visitor to Jerusalem who does not know the things that have happened there in these days?” 19 And he said to them, “What things?” And they said to him, “Concerning Jesus of Nazareth, a man who was a prophet mighty in deed and word before God and all the people, 20 and how our chief priests and rulers delivered him up to be condemned to death, and crucified him. 21 But we had hoped that he was the one to redeem Israel. Yes, and besides all this, it is now the third day since these things happened. 22 Moreover, some women of our company amazed us. They were at the tomb early in the morning, 23 and when they did not find his body, they came back saying that they had even seen a vision of angels, who said that he was alive. 24 Some of those who were with us went to the tomb and found it just as the women had said, but him they did not see.” 25 And he said to them, “O foolish ones, and slow of heart to believe all that the prophets have spoken! 26 Was it not necessary that the Christ should suffer these things and enter into his glory?” 27 And beginning with Moses and all the Prophets, he interpreted to them in all the Scriptures the things concerning himself.
28 So they drew near to the village to which they were going. He acted as if he were going farther, 29 but they urged him strongly, saying, “Stay with us, for it is toward evening and the day is now far spent.” So he went in to stay with them. 30 When he was at table with them, he took the bread and blessed and broke it and gave it to them. 31 And their eyes were opened, and they recognized him. And he vanished from their sight. 32 They said to each other, “Did not our hearts burn within us while he talked to us on the road, while he opened to us the Scriptures?” 33 And they rose that same hour and returned to Jerusalem. And they found the eleven and those who were with them gathered together, 34 saying, “The Lord has risen indeed, and has appeared to Simon!” 35 Then they told what had happened on the road, and how he was known to them in the breaking of the bread.
We read in this narrative about several movements in the hearts and understanding of the disciples. First we hear those desolate phrases: ‘were sad’ and ‘had hoped.’ This after the Crucifixion of Jesus. Then they meet the stranger on the road who opens their hearts to understand the mystery of the suffering Messiah and how Jesus had, even by His death, fulfilled all the prophesies of the Old Covenant. Next they invite the stranger to stay with them. Then, in the blessing and breaking of bread their eyes as well as their hearts are opened and they behold the Resurrected Christ! This is a Eucharistic revelation as the Gospel suggests and, as we will see, Caravaggio’s painting makes explicit. At last, a moment after they recognize Him, Jesus vanishes from their midst.
This Scripture is deep with meanings and I will not attempt a comprehensive exegesis of it. We will see how Caravaggio’s masterpiece offers profound spiritual insight into this narrative. For now, I just want to share my personal testimony of how painting the Supper opened my heart and my eyes, like the disciples described.
I confess that when I began this painting I was sad and was preoccupied with sorrows from my past, and that I ‘had hoped’ and felt that many of my hopes had been disappointed.
Part II: Theological Symbolism


Part III: The Technical Process
The first step in preparation process for the support (painting surface) includes stretching the linen and sizing it with rabbit skin glue which protects the fabric from the corroding property of the oils used in the painting. The second step involves preparing the oil primer which is the base color and ground used by the artist in this work. In Caravaggio’s 1601 Supper at Emmaus the primer is a combination of red earth, yellow ochre, and raw umber pigments with calcium carbonate (marble dust), lead white, and drying oil. This combination makes a ground that is leaner (less oil) than the paint that will be applied on top and is a warm red earth color that the artist utilized to great effect for the warm shadows in the painting. (Video footage by Damian Chlanda)
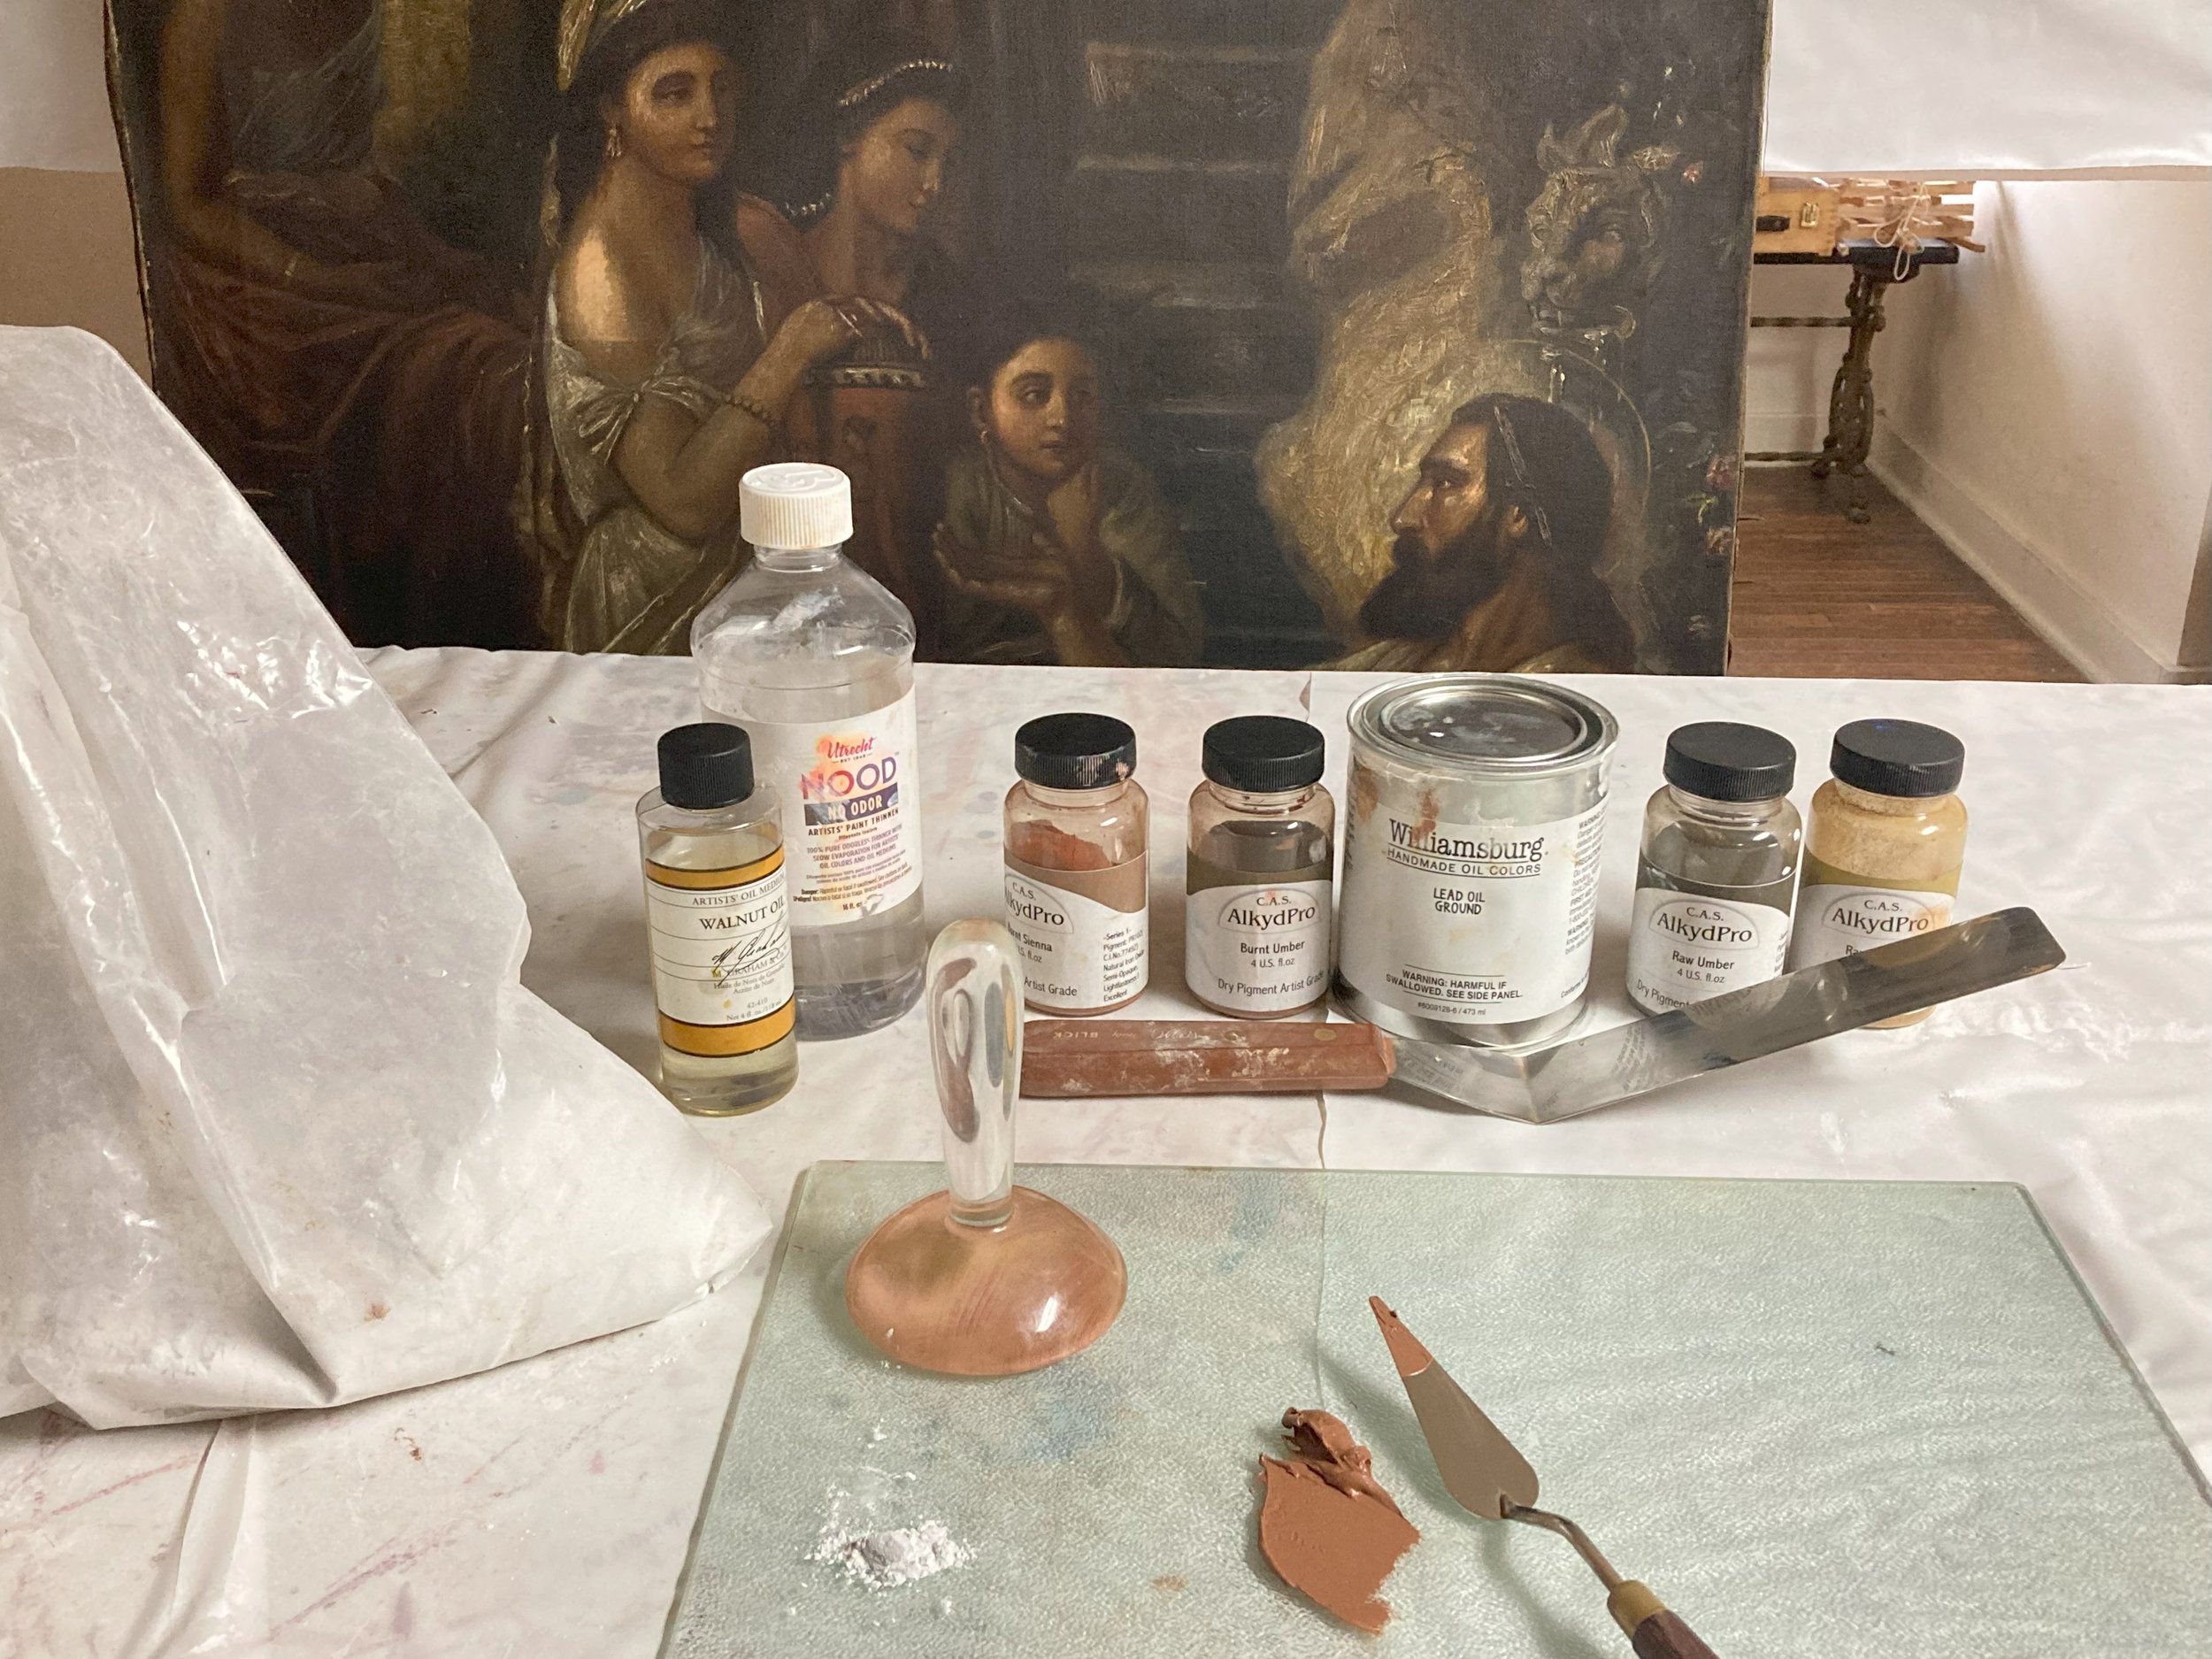
The pigments and oils used for making the primer

Applying the first layer of the primer
After the primer was applied, I then needed to copy the composition of the whole painting. I made an under-drawing in charcoal of all of the elements of the composition by first tracing cut-out prints of each segment, and then refining the information by drawing by hand from observation of the original painting. This was my way of making sure I had the right placement of each element of the composition; it was like a giant jigsaw puzzle. Caravaggio, conversely, is not known to have made elaborate under-drawings or used a cartoon (transfer of a preparatory drawing onto the support) like most of his contemporaries. Instead of carbon under-drawings, what we see in analyses of his paintings are incision marks, made directly into the wet primer, which indicate where major compositional elements would be placed. These incised marks were used by him a guidelines in lieu of a traditional drawing.

The red lines here indicate incision marks. Madrid’s Museo Nacional Thyssen-Bornemisza’a Saint Catherine of Alexandria. https://www.thehistoryblog.com/archives/53689

My under-drawing in progress
The first layer I painted was 1) the dark background against which I would establish the lights in the figures, and 2) my first figure (the servant on the top left) with the light of his skin. Caravaggio is suggested to have worked on the first layer of light by mixing lead white directly into the still-wet primer, thus achieving a tinted pink skin tone for the first layer of light and leaving the untouched red-toned primer for the shadow areas. Instead of painting wet-in-wet for my very first layers I mixed lead white with red earth to achieve the same hue the artist would have used for the first layer of lights. I painted less directly than Caravaggio in the first layer because it was so crucial to make sure I got exactly the right shapes and values for the copy and could not risk making a mistake that would be embedded in the primer of the whole painting. However, consistent with Caravaggio’s very efficient painting approach in this first and in successive layers was my building up of the painting with first just tinted light and exposed primer, and then second light on top of first, and glazed (dark transparent color) shadows on top of the primer, so that the primer color holds the shadow areas. In this way each area is made up of at least four parts: 1) first light, 2) exposed primer shadows (mid-tones), 3) second light, and 4) glazed shadows over primer. In fact, there is also usually a fifth layer of brightest highlights, especially on the skin. Importantly, Caravaggio also painted wet-in-wet for many of these layers, blending hues and values as needed in very spontaneous manner. Conversely, where certain colors could only be achieved by glazing successive layers, he would work more indirectly, allowing one layer to dry before applying another color glaze to achieve the desired results. Because he was an artist who adapted his techniques to work as efficiently as possible, it is totally incorrect to say (as so many do) that he worked in one way throughout the entire painting, always applying indirect layers. To authentically reproduce Caravaggio’s technique requires familiarity with the historical pigments he used and their properties, a working understanding of the processes of painting (especially the interaction of layers), and study of art conservation analyses of his specific artworks, all of which he customized different primers for.

Development of the servant figure from left to right

Hand of the disciple of the right side of the painting. Two layers of light and two layers of shadow are clearly visible here.

Here on the green jacket of the disciple on the left, we see how the interaction between layers of paint colors change the apparent hue of the paint. The terra vert green is painted on white in the central square and the exact same pigment appears a rich vivid, bluish green when painted over black.

This grape leaf could not be made sufficiently blue-green by painting directly. I had to let the first layer of lead-tin yellow light mixed with azurite and malachite dry before glazing over it with more azurite and malachite in a transparent layer to achieve the correct hue.
I only used pigments that were available in 1601 and that were documented in conservation analyses of the pigments in Caravaggio’s paintings. This was the most exciting material aspect of this work. Each color is not only different in appearance but has unique properties, including transparency, drying time, tinting strength, and rheology (viscosity and flow). Even when limiting my palette to historical pigments there is great variety between the same pigments that are attained from different sources or processed in different facilities. For example, I originally had only one red vermillion (also called cinnabar) which is mercury sulfide and is not commonly used today because it is poisonous. My Gazo Vermilion was a brick red which was perfect for the red sleeve of the servant on the left, but not sufficiently bright for Jesus’ robe. I therefore also obtained another true vermilion produced by Holbein. Even then, I only found the right red for Jesus’ robe when I glazed the Holbein vermilion with genuine red madder (another rather rare and expensive pigment).

The red of Jesus’ robe is much more vivid than the red on the sleeve of the servant on the right

Historical pigments on my palette from left to right:
vine black, azurite, malachite, Bohemian green earth, Verona green earth, raw sienna, raw umber, red iron oxide, Pompei red earth, burnt sienna, Italian brown ochre, yellow ochre deep, French yellow ochre, lead-tin yellow light, lead yellow.
Additionally, there is an enormous variety of ochres. There are earth pigments that have various hues based on the natural variety at the cites where they are obtained. Therefore, I sampled as many varieties of ochres as possible to find the ones that gave the right results. I sampled colours on a canvas that I primed with the same primer as my painting support so that I could see the accurate color relationships.
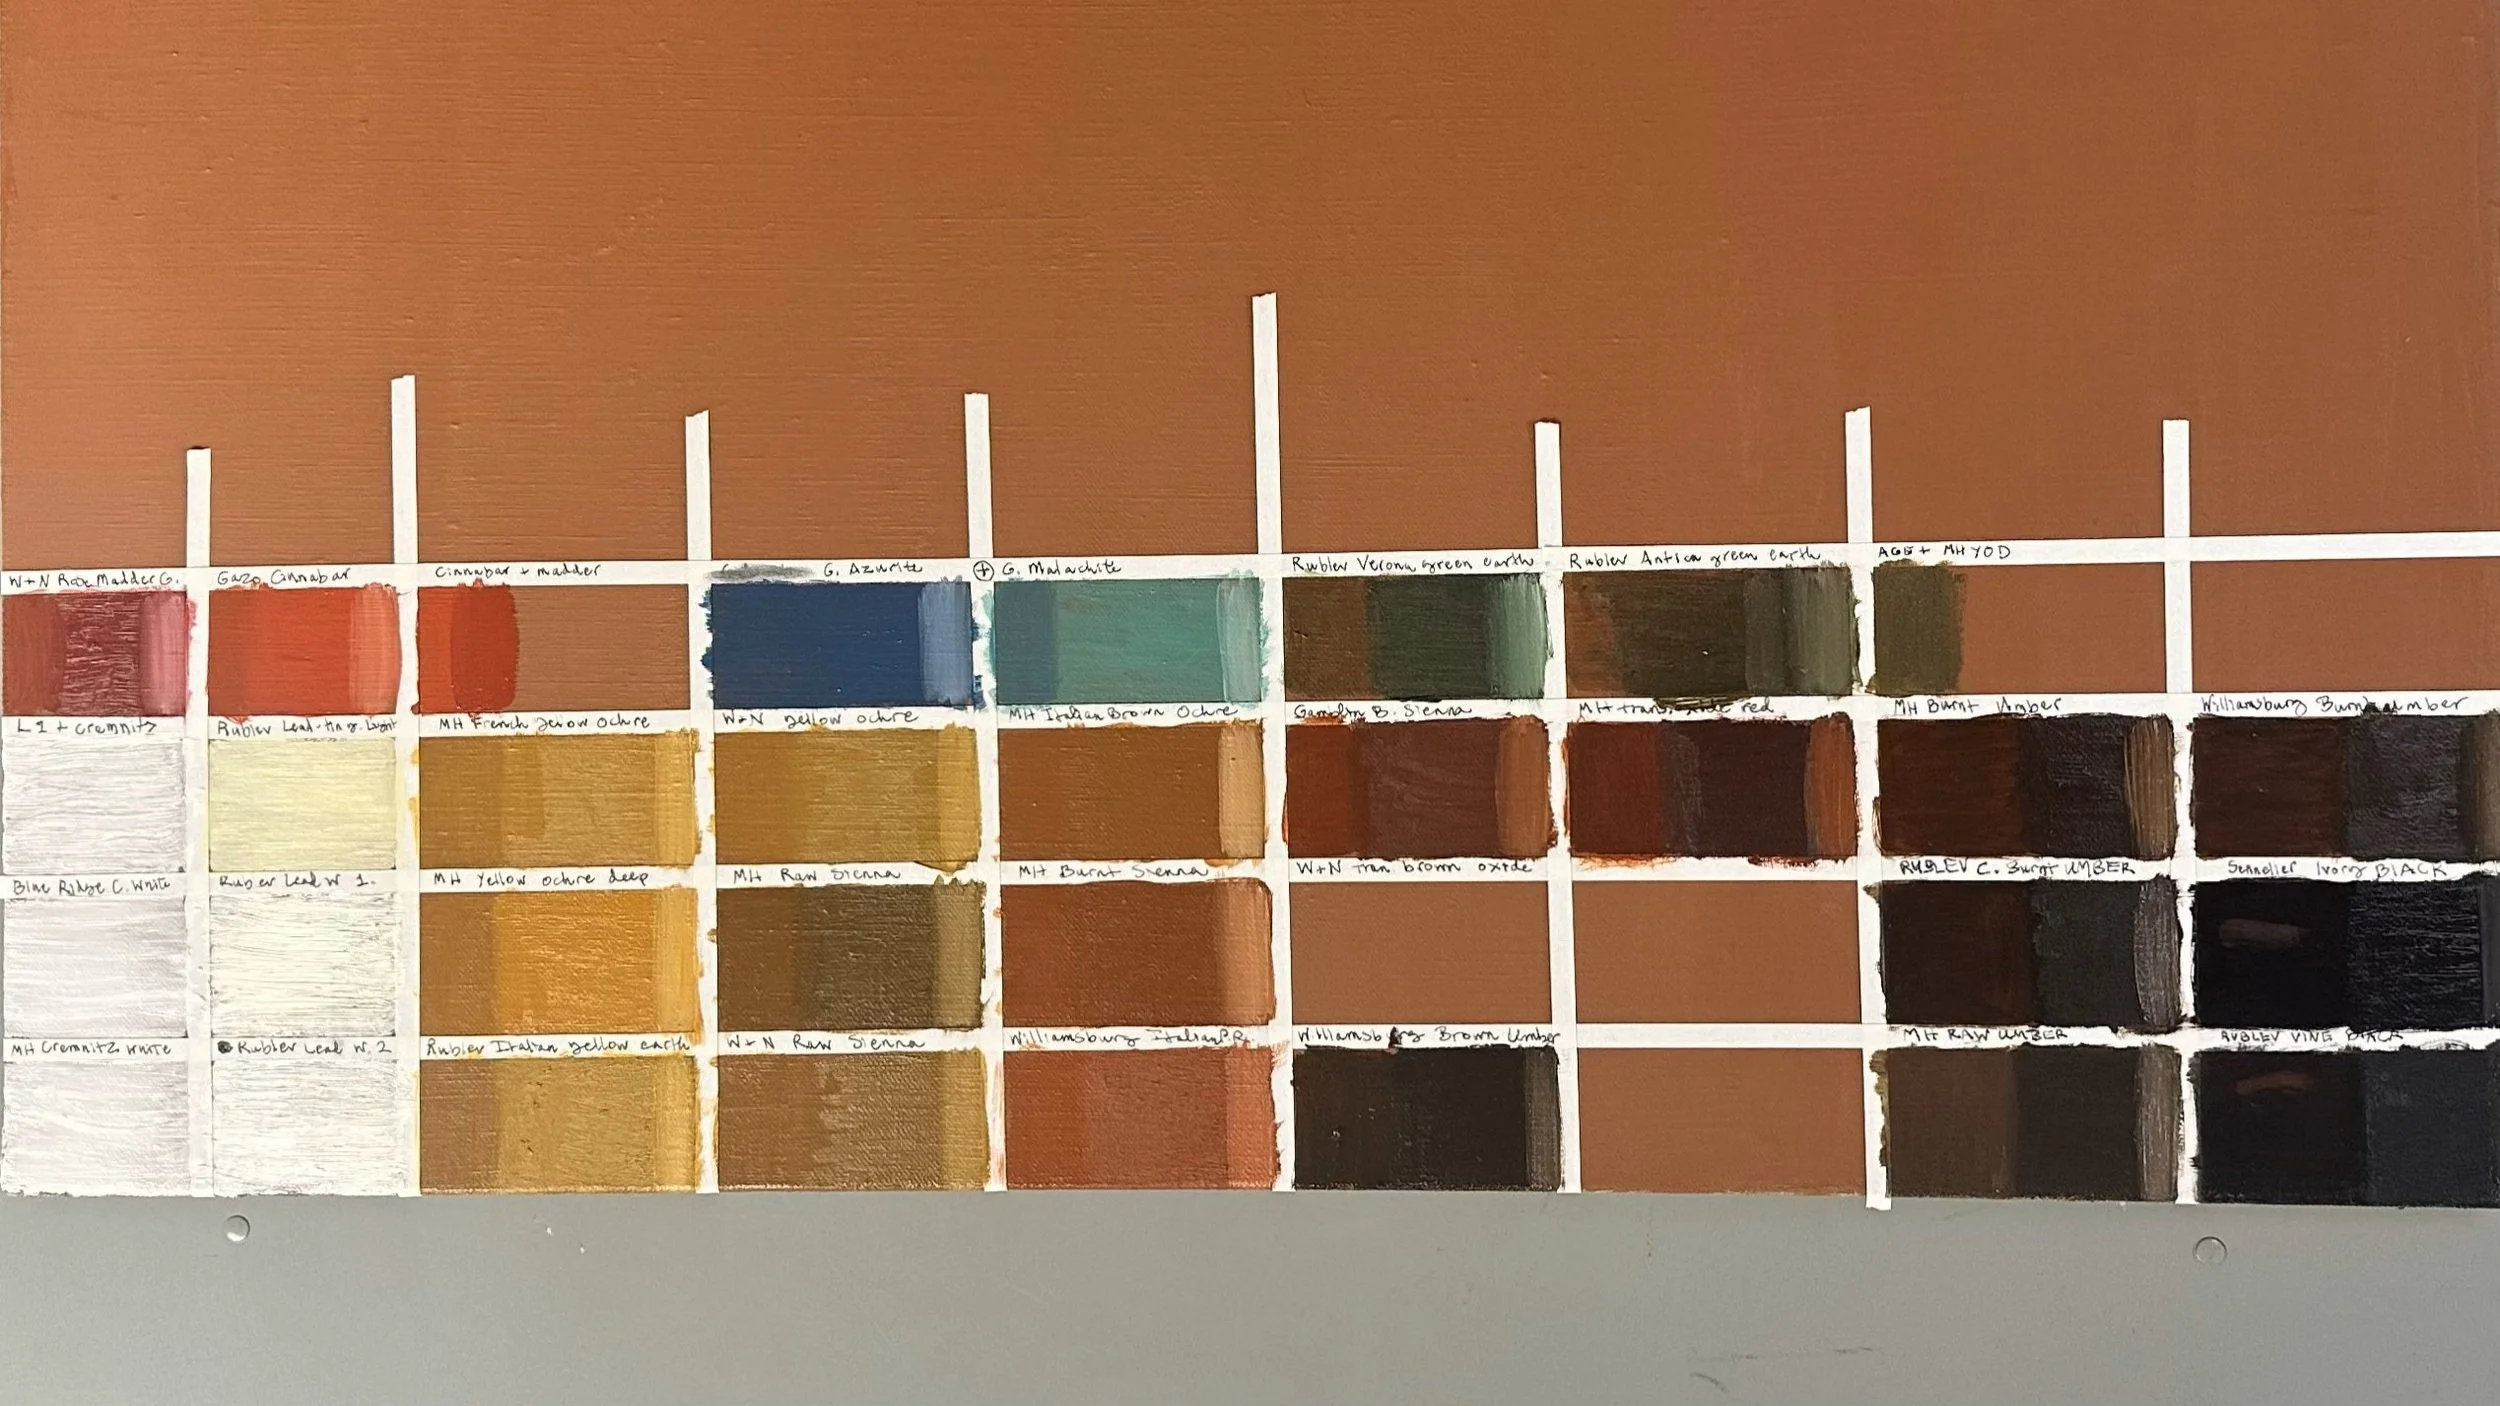
Each pigment is applied over the primed surface as it is directly from the tube of paint, also thinned with oil to be transparent, and mixed with lead white to see how it tints.

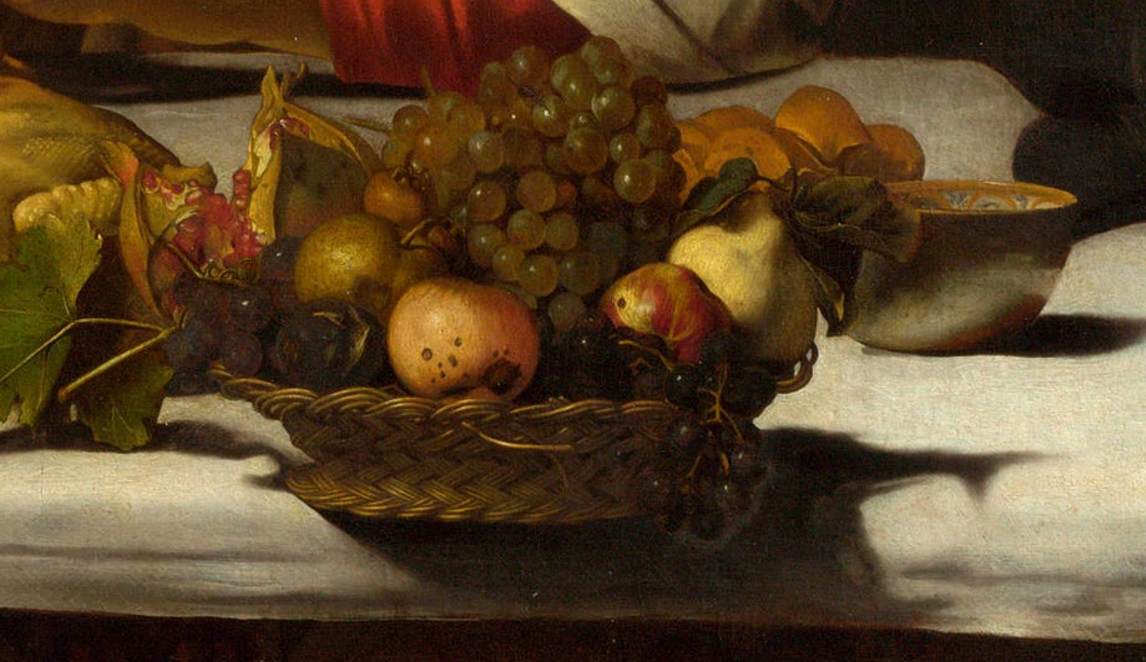
Finished fruit basket
As a final reflection on the technical process, I want to answer some questions that often come up about making a master copy:
1) Why make a copy rather than just have a printed image of the original?
The answer to the first question is that a painting is a three-dimensional object and the layers of paint and colour produce an optical experience that is impossible to reproduce with any other media or technique. Therefore the experience of the beauty of the surface, of the colours, of the texture, is only possible when you are standing in front of a real painting that communicates the same dynamics as the original. A print reproduction of an artwork at best merely serves as a reminder of the beauty that one has seen in person and can help one recollect in imagination the actual phenomenological encounter with it.
2) Since it’s impossible to perfectly reproduce a painting, what do I as a copyist bring to it that is unique; that is, what makes a Sarah Crow copy of a Caravaggio special? To bring home the significant differences between a copy and an original even when the appropriate historical materials and techniques are being applied, think about the hairs of the beard of the disciple on the right. Lots of little strokes would have been made very quickly by Caravaggio, while I have to imitate the gesture and placement of each one accurately which means that I had to paint very slowly a passage of painting that Caravaggio would have painted very quickly. This happened all over the place.

Considering this need for accuracy, sometimes at the expense of the spirit of the original, my painting was a much slower and more careful painting that Caravaggio’s. That said, with the same careful attention, I was able to lavish this painting with all the subtly and softness that I love and which is truly present in Caravaggio’s masterpiece. I find that most copies of Caravaggio’s work tend to emphasize the drama and the boldness of his paintings and completely miss his tenderness and soft edges and subtle modeling. It’s as if the dramatic persona of the artist is translated into how people look at and copy his work, and the sensitivity of the painter is often left out of the picture. Finally, I did enormous research in art conservation books and applied painting studies to truly understand the techniques and materials Caravaggio used. This research was indispensable to producing a quality copy. If one uses unhistorical materials and techniques, one makes a copy of the image of a painting but not of the painting itself.

Complete.